Cold Coffee
never breaking news.

Having issues: defeat streaky development in 2017
Develop your own film? Here's a common development issue that can pop up from time to time. It's a streak of extra density running across the short dimension of roll film, visible especially in light areas such as the overcast sky seen this example. It can happen with both 35mm and 120 size film, this one is on some 120 Ilford FP-4+. I've cranked up the contrast a bit in the scan to make this devil more obvious.
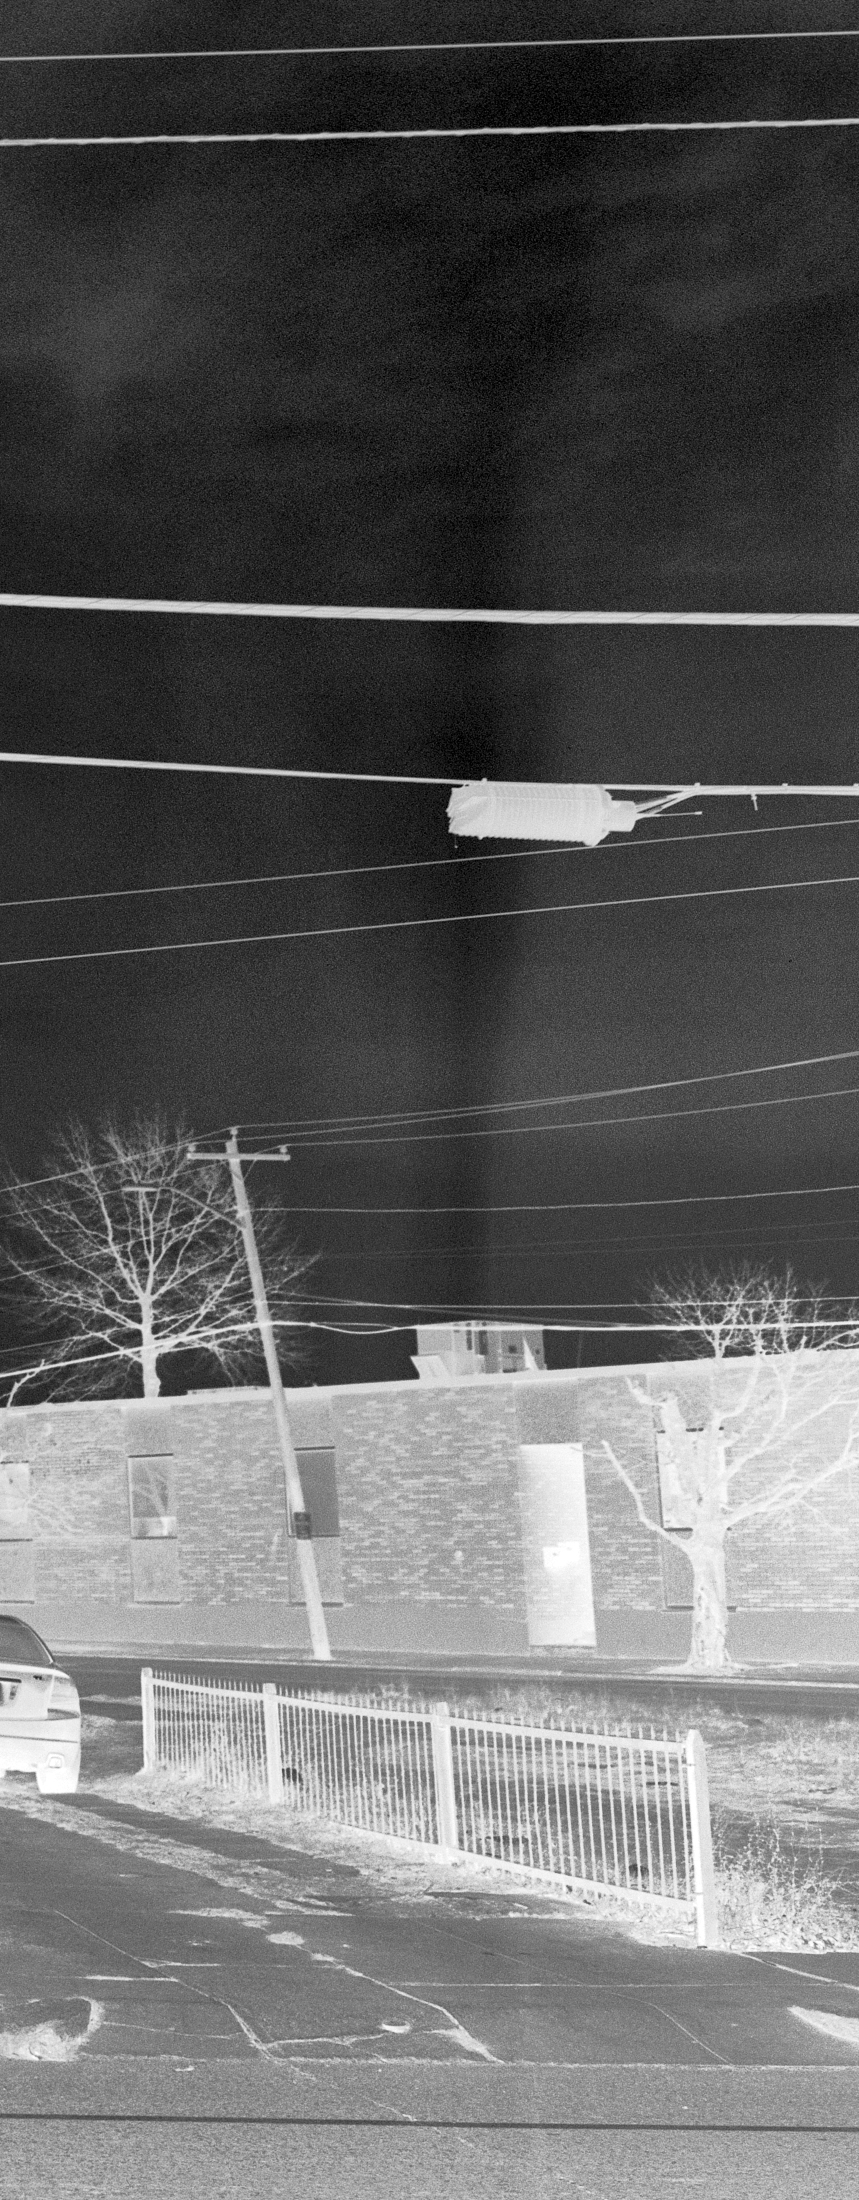
In the negative...

As a positive.
What is the cause? This problem occurs during the initial seconds when developer is being poured into the developing tank, especially with 4 or 8 35mm reel size tanks. As the tank fills developer comes in contact with the film before the reel is totally immersed. The time between contact and full immersion is long enough for development to begin in the area of contact. This creates uneven density in an area where it should be uniform. Not good.
Happily I can think of many solutions to this problem. Let's dive in.
- 1. Get fundamental. First thing is to to check your pour technique. You should be aiming to have the tank filled within 15-20 seconds. Tip the tank slightly as you fill to allow air to escape and then pour pour pour. Then cap the tank and agitate with vigor. If that doesn't work:
- 2. Give up. Send your film off to a lab and let someone else worry about it. Upside: More time to do other things. Downside: additional expense and the loss of control over a crucial part of your work process.
- 3. Give in. Accept that an occasional streak or spot, bleep or bloop is just a natural part of an organic process and just proves that your pictures aren't made by an unfeeling machine but by a flesh and blood person keeping it real. Downside: some people won't get it and will just think you're sloppy.
- 4. Give over. Figure that it will happen once in a while so shoot only dark and busy images that will hide a random streak, or if you do wish to photograph some lovely light grey tone, take a page from your cousin the "professional" photographer and spray and pray. Downside: wasting film and becoming your cousin.
- 5. Modify. Change something in the hope that the problem will go away. For instance try a different film type. Maybe HP-5 will be ok if FP-4 wasn't. Downside: giving up on a film that you otherwise like, creating limitations for yourself as you eliminate film types one by one, still experiencing the issue since in fact you're not actually addressing the problem.
- 6. Slow down. Change your developer or developer dilution so it's less active. In theory this will give you more time before development begins. Downside: Development time is longer. There may be changes in image quality that you may not care for. Difficult to know how much dilution is enough before you risk exhausting the developer.
- 7. Scale down. Develop all your film one roll at a time in small tanks. Downside: takes much more time that you might wish to use to do other things.
- 8. Scale up. Get a processing machine like a Jobo. Downside: expensive, takes up more space, not very portable.
- 9. Presoak. You will find a fair amount of debate over the efficacy of presoaking your film in water. On the one hand the manufacturers say it's not necessary as modern films have incorporated surfactants to encourage even development. On the other hand many people have had complete success using a presoak, including Ansel Adams. Jobo recommends a presoak for their rotary process. The theory is that a presoak will encourage even development as the water absorbed by the emulsion will be displaced by developer slowly, with the added benefit of bringing the tank to the process temperature.
Personally I used a presoak for many years (largely because of Ansel's recommendation) with little issue. Oddly, one issue I did have was with X-tol developer in a rotary Jobo processor, I was getting the dreaded "wagon ruts", bands of uneven development running the length of the film. Jobo support recommended skipping the presoak which did in fact eliminate the problem. But I digress. For many years now I've not used a presoak but I feel pretty safe in saying that there's little risk if you do. Downside: one more step added to the process, some small adjustment in development time may be needed.

The handy lifting rod.
- 10. Get a lift. This one requires the fewest changes, but does require that you develop your film in an actual dark room and have a second developing tank on hand. A lifting rod is very useful, but not completely necessary. For the big 8 reel tanks (and larger!) this is the best method to ensure not only even development but to be certain that the film on the top of the tank is being developed for the same time as the one on the bottom.
How to? Place your loaded reels into one tank, using the lifting rod if you have one. Fill the second tank with developer. Turn out the lights, open the film tank and lower the reels into the developer, smooth and steady. Cap the tank and agitate as normal. Now you can switch on the lights and continue as usual. Downside: you need a darkroom.
Issues with film development can creep into the process of even the most careful worker, or lab. Hopefully one doesn't cost you a once in a lifetime image. If you take the time to understand the problem and to review the fundamentals you should be back up and running with confidence in short order.

Gabich Magazine
Just in time for the holidays! I collected some trash and made a magazine which you can order on Blurb. What a thrill for you.
An alternative approach to contrast control with HC-110
When developing film, vary dilution with HC-110, not time and get the contrast you want.

There is more than one way to skin an onion and this take on film processing is a good example. Kodak's HC-110 is a very versatile liquid developer that gives excellent results with many films and is known for long shelf life. It works well in small tanks and in rotary systems. It was my standard developer for many years and although I no longer use it regularly I still recommend it to anyone looking for a good all-rounder.
The approach described below is one where different contrast ranges are achieved by using developer dilution as the variable, instead of the usual change in time. Here time, temperature and agitation are kept at a constant. I didn't create this but I have used this myself, probably because I enjoy the way it gets me thinking about film development controls in a new way.
What follows is transcribed from The Handbook for Contemporary Photography, 4th Edition by Arnold Gassan. 1977. Arnold was a professor of mine at Ohio University and I don't think he would mind me sharing this. I think it interesting and still useful.
Contrast Control through Developer Dilution
Another way of controlling contrast...is through varying the dilution of the developer. This is a very useful control with some of the liquid concentrate stock solutions, and of these Kodak HC-110 developer offers exceptional qualities.
Contrast control through developer dilution uses the high energy HC-110 with its almost unique ability to provide very clean separations of shadow densities and also offer linear separations of all equal exposures into the high densities, even though diluted to a very great degree.
The effects of varying developer dilution for HC-110 and Tri-X rather than developing time can be seen by examining figure 4-31.
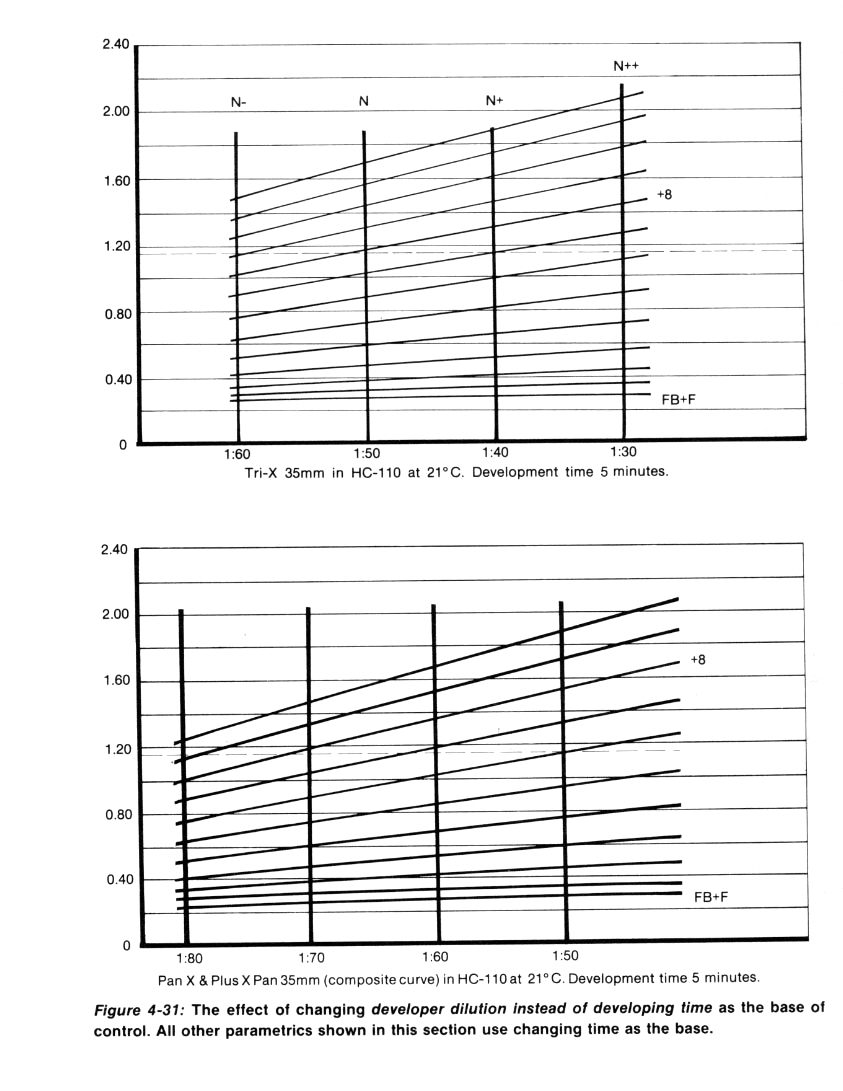
These curves show the equal separation in the shadows and also the contrast variations possible by merely varying the concentration of the HC-110 while keeping time, temperature and agitation constant.
The advantage of this system is that a widely distributed, very stable, highly concentrated commercially available developer of known quality is used only at a standard time-- one which is physically long enough to avoid problems inherent in short developing time. The concentrated syrup can be measured accurately with pipettes, or this simple two step dilution schedule can be employed:
Make a working stock of 1 part developer and 9 parts water.
Do not mix more than what will be used in a few days.
Distilled water is recommended.
From there dilute the working stock in dilutions as follows to make dilutions of approximately:

*Total=450 ml for a two reel tank.
In my own approach to HC-110 I have always skipped the stock solution step and mixed my developer directly from the syrup. I also abandon Kodak's letter system (dilution A, B, C etc) and use a ratio that is easy for me to remember and to mix. I used that with this system and when I use HC-110 in the more conventional way.
Gassan provides some recommended dilutions for a variety of films, but keep in mind a few things:
- These dilutions are from the 1:9 stock solution to approximate dilutions from the syrup (ratios in the left hand column).
- This data is from 1977 and films have changed
- He finds that a "decade change of dilution e.g. a change of 1:50 to 1:60 approximates a paper contrast grade". (for Kodak films, see below)
- The system works for Ilford films as well, but that they exhibit greater sensitivity to developer strength variations.
- There is almost no loss of shadow detail with this developer, even at the extreme dilutions.
All film is developed in HC-110 at 21C / 70F for five minutes with standard agitation.
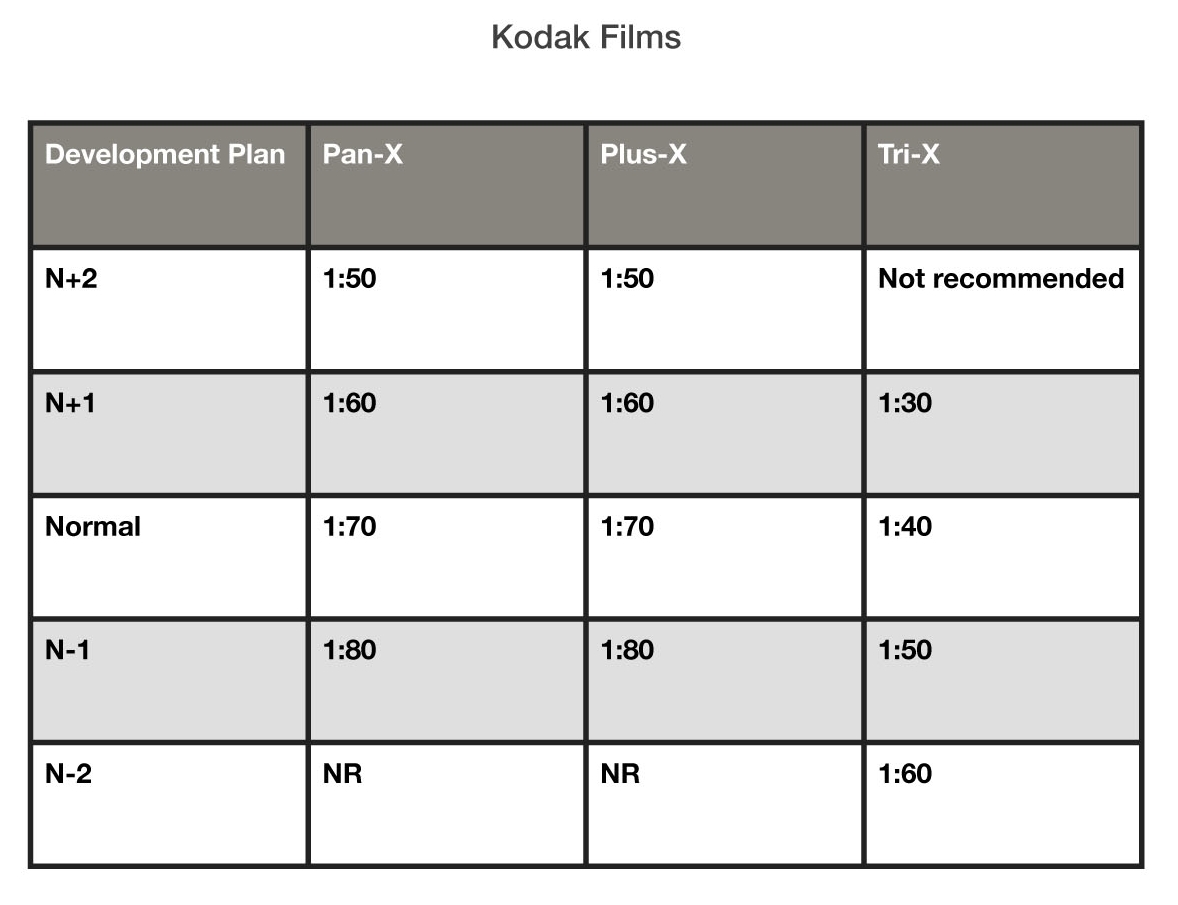
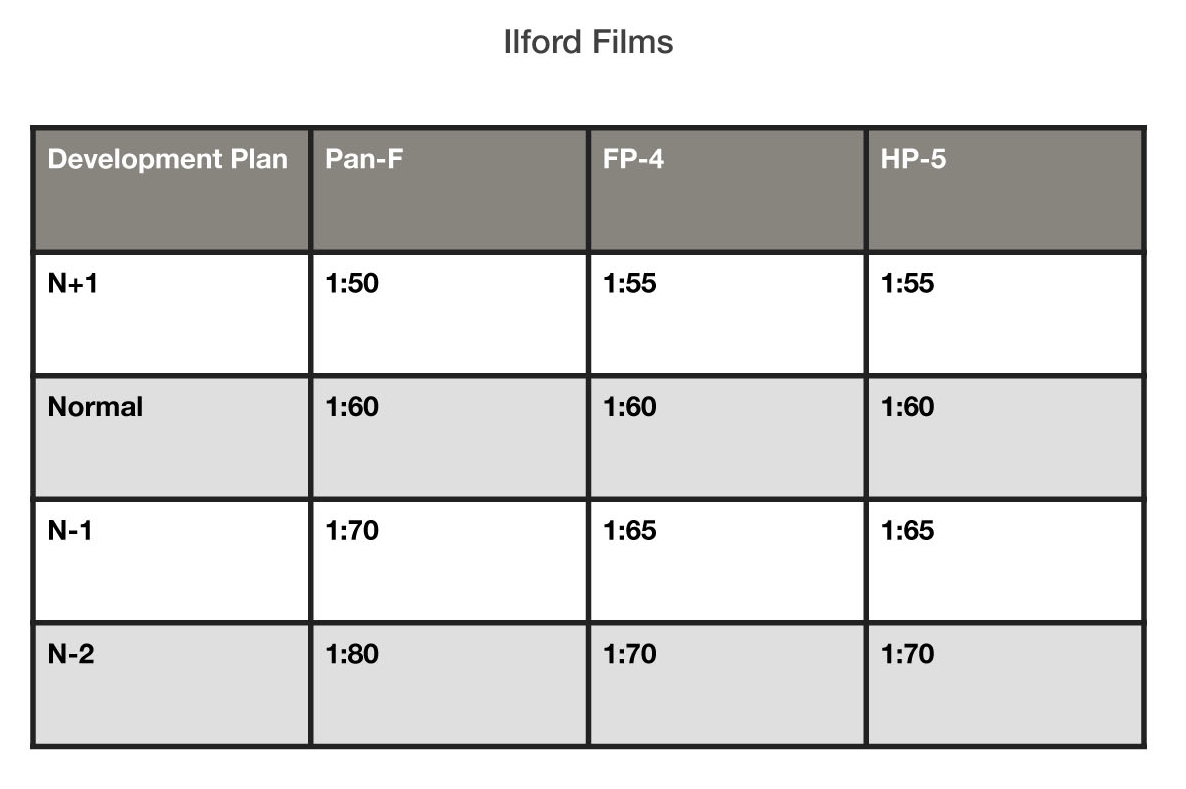
"N" meaning Normal contrast in zone system terminology
Gassan based these dilutions on a goal of developing a highlight density [zone VIII], to a density of 1.15 above FB+F.
He concludes with this insight into his approach to 35mm photography:
The whole purpose of this control system is to produce high quality, low density negatives that will print easily and well, rather than to "push" film. High energy developers produce high densities under extreme low light levels. And they also produce negatives that are more graphic and less tonal -- that are not so much translations of colors into the grey scale of the photographs as they are graphic simplifications of the world.
The sense of graininess in 35mm is affected by exposure far more than most photogaphers are willing to admit. A correctly exposed minimum density negative is "filmy"; this means that the page of a book can be read easily while looking trough the negative. The least overexposure will mar otherwise excellent negatives that would enlarge well and have maximum resolution of detail. Two stops overexposure will enlarge the grain so much that the maximum degree of enlargement with out obvious grain is about 6 diameters.
I've no doubt that many of his former students remember him saying "make a negative that prints easily and well..."
I've used this system myself and found that it worked quite well with Ilford HP-5. My "normal" was 1:55 for 5 minutes at 70˚F. That was over 20 years ago, so please take that, and all of this as starting point for your own testing.

Field Notes: Photographing what's not there.
Making the photographs for the 2015 Most Endangered Properities show.
Former site of Fruit Hill School. 2015
Now that the Most Endangered Properties 20th Anniversary Photography Exhibit is now open I can share my contribution and how it was done. This year I took on the task of photographing three sites where the endangered property could not be saved. These are the former sites of the Grove Street school, Fruit Hill school and Providence Fruit and Produce warehouse. Two locations are currently empty lots and the third has some new commercial development. A full history of each site can be found here.
Former site of Grove Street school. 2015
Former site of Fruit and Produce Warehouse. 2015
I took an approach with these locations to layer the current state with what was lost using in camera montage. Each space was photographed on a roll (two rolls) of 35mm film. I chose not to go with just one set point of view, rather I walked the site and recorded what saw and what interested me as I explored the space. I moved from wide views to details, looking for good coverage and nice juxtapositions. The film was then rewound, leaving just the leader exposed and identified by site.
Back in the studio I set up for basic copy photography, mounting the camera on a vertical stand and swapping in a macro lens. I had previously collected vintage images of each site, in the case of the Produce Warehouse I used my own images from the 1990s. I used archive images of the two schools including some vintage postcards. On each site I had about a half dozen different archival images to choose from. I used 5x7 prints of each. I then reloaded the film and cycled through the various images, sometimes altering cropping and exposure.
I then crossed my fingers and processed the film in the darkroom. I easily could have done this digitally but one of the wonderful aspects of shooting film is to open your work up to an element of chance. I always look for ways that I can introduce the "happy accident" or employ a chance operation. There is risk, but in risk their can be reward. Happily I felt I was rewarded here.

HARRY CALLAHAN Providence, ca. 1966 (Shepards)
Astute photo history people no doubt notice that I was inspired in this by the work of the master photographer Harry Callahan. In the 1960s during his tenure as the head of the photo program at RISD he did an amazing series of in camera montages, photographing, most appropriately. in downtown Providence among other places. The image above features the storefront windows of Shepards department store. The Shepards building was one of the very first properties on the MEP list and happily has been saved.
As I was working on deadline, I hedged my bets and shot each site in a more conventional way. It never hurts to have a backup plan. These were also shot on film, this time on 120 format using a Graflex SLR. This type of camera lends itself to a low point of view which seemed appropriate to me for these vacant sites, especially the former school locations.
Former site of Fruit and Produce Warehouse. 2015
Former site of Fruit Hill School. 2015
Former site of Grove Street school. 2015
Bye bye Kodachrome

Sometime today the last roll of Kodachrome film will be developed at Dwayne's Photo in Parsons Kansas. It is the final end of an era. Much like John Lennon's quip about Elvis, for me they killed Kodachrome when Kodachrome 25 was discontinued. That was in 2001. In reality I had long before switched to E6 films.
I learned photography shooting Kodachrome. I took pictures of trains with my dad and my uncle John, in those days you weren't a serious railfan unless you were shooting Kodachrome. We shared images via slideshows and that's what the magazines wanted, not that I ever felt good enough to submit images to any magazines. The credit in the rail magazines wasn't just "photo by..." it was "kodachrome by ..."
I think shooting slides is a great way to learn photography, you see very clearly what changes in exposure can do, what differences in the color temperature of light can do, what color can do, what light itself can do. There was also that excitement in getting the yellow box, and the smell! Memories.
My family shot stills, slides, we didn't do home movies at all, so that is something I've come to later in my life. If you haven't had the experience, home movies on Kodachrome are amazing. Simple, magical slices of time. There really is nothing else like that. That ends today too.
I am happy to say that among the mountain of film that Dwayne's got this week is one roll of slides and three rolls of super 8 film from me. Film shot in tribute to the great American invention: Kodachrome, and for a life happily spent (so far!) in photography.
Farewell Kodachrome.